Are you ready to turn a simple plate into a gateway for endless creativity? Fun Crafts with Paper Plates for Preschoolers often begin with the perfect canvas. Sustainable and low-cost compostable plates are fantastic for little hands. This type of creative project boosts fine motor skills and encourages self-expression.
Tip: Crafting offers a wonderful way for your preschoolers to explore new arts and crafts ideas.
We have packed this guide with engaging paper plate crafts. You will find many fun crafts with paper plates for preschoolers. These easy crafts and easy paper plate crafts require very little prep time, making your next activity a breeze
Key Takeaways
Paper plate crafts help preschoolers be creative. They also improve fine motor skills.
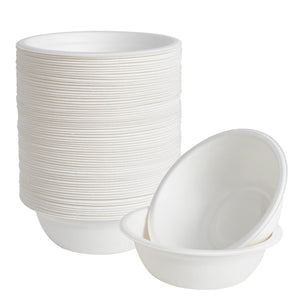
Ecolipak sugarcane plates are strong. They are safe for kids and good for the Earth.
You can make many crafts with paper plates. These include animals, seasonal items, and other fun projects.
Simple supplies like paint, glue, and construction paper are useful. You can make many different crafts with them.
Crafting with kids creates good memories. It helps them learn and grow.
Choosing the Best Plates for Your Crafts
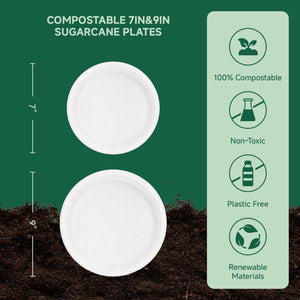
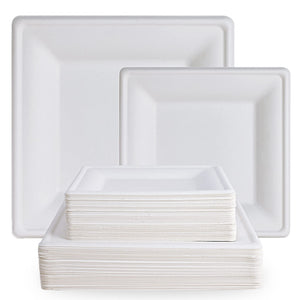
The foundation for amazing paper plate crafts is choosing the right plate. You need something that can handle a preschooler's creative energy! That’s why we recommend Ecolipak's Compostable Sugarcane Plates as the perfect canvas for your next project.
Unlike flimsy alternatives, these plates are heavy-duty and won't get soggy from paint or glue. Your child's masterpiece will stay intact! Most importantly, you can feel great about what your child is handling. Ecolipak plates are made from natural sugarcane, which means they are completely safe for little hands.
Peace of Mind for Parents: These plates are designed with your family's safety as a top priority. They are free from harmful chemicals often found in plastics.
Safety Feature |
Why It Matters for Crafting |
|---|---|
Ensures no harmful chemicals are present, even when using wet materials like paint or glue. |
|
Toxin-Free |
Made from 100% food-grade sugarcane fiber, so you don't have to worry about what your child is touching. |
Fully compostable, turning your crafting fun into an earth-friendly activity. |
Choosing Ecolipak is a wonderful decision for your kids and the planet. These plates break down naturally in just a few months, unlike plastic plates that pollute for hundreds of years. Plus, they come in various sizes like 6, 7, and 9 inches, perfect for making anything from a tiny ladybug to a big lion face!
Ready to get started? Here are a few other supplies you might need:
Non-toxic paint or crayons
Kid-safe scissors
School glue
Googly eyes
Construction paper
Fun Paper Plate Animal Crafts
Get ready to roar, swim, and buzz! Transforming a simple plate into a whole zoo of critters is one of the most classic fun crafts with paper plates for preschoolers. These paper plate animals are perfect for sparking imagination and practicing fine motor skills. You can create a whole menagerie, from a paper plate cow and a paper plate sheep to a paper plate monkey or even some paper plate dinosaurs! Let's start with a few fan favorites.
Simple Lion Face
Your little one can create the king of the jungle with just a few simple supplies. This paper plate lion is a roaring good time!
Start by painting your Ecolipak plate bright yellow. Let it dry completely.
Cut several strips of orange, yellow, and brown construction paper. These will be the lion's magnificent mane.
Once the paint is dry, glue the paper strips all around the back edge of the plate. Layer the colors to make the mane look full and vibrant.
Cut two small half-circles from yellow or brown paper for the ears and glue them to the top of the head.
Glue on two googly eyes.
Use a black marker to draw a simple triangle nose, a mouth, and some whiskers. Your fierce lion is ready!
Easy Fish Craft
Let's dive under the sea with this colorful paper plate fish. This is one of the easiest paper plate crafts and looks fantastic hanging on the wall.
First, cut a small triangle wedge out of the side of your plate. This little cutout will be the fish's mouth.
Glue that same triangle piece onto the opposite side of the plate. It now becomes the tail!
Now for the fun part: the scales! Tear up small pieces of colorful construction paper or tissue paper.
Cover your paper plate fish with glue and let your preschooler stick the torn paper pieces all over the body. Overlapping them creates a wonderful scaly texture.
Finish your fish by gluing on a googly eye near the mouth.
Cute Ladybug
Who doesn't love a cute little ladybug? This craft is simple, adorable, and a great way to practice counting spots.
Paint the entire plate bright red and let it dry.
Cut a half-circle shape out of black construction paper for the ladybug's head. Glue it to the top edge of the red plate.
Use black paint or cut-out black paper circles for the spots. Let your child decide how many spots their ladybug gets!
For the antennae, fold a black pipe cleaner in half and tape it to the back of the head. You can curl the ends for a cute finishing touch.
Bouncing Jellyfish
This jellyfish craft is so much fun because its tentacles really dangle and "swim" in the air.
Crafting Tip: This is a great project for using up leftover scraps of yarn, ribbon, or streamers from other arts and crafts projects!
Start by cutting a paper plate in half. You only need one half per jellyfish.
Let your preschooler decorate the rounded side of the plate half with paint, crayons, or markers. This is the jellyfish's body.
Cut several long pieces of yarn or ribbon. These will be the tentacles.
Once the plate is dry, turn it over and tape or glue the yarn pieces along the flat, cut edge.
Flip it back over and add two googly eyes to bring your bouncy jellyfish to life!
Friendly Turtle
Slow and steady wins the race! This friendly turtle craft is a wonderful way to play with shapes and colors.
First, paint your paper plate green. This will be the turtle's shell.
While the paint dries, cut out shapes from different colors of construction paper. Squares and hexagons work great for decorating the shell.
Glue the paper shapes all over the painted plate to create a beautiful, mosaic-like shell.
From green construction paper, cut out a head, four legs (flippers), and a small tail.
Glue the head, legs, and tail to the bottom of the paper plate so they stick out from under the shell.
Use a marker to draw a happy face on your turtle!
Paper Plate Tiger
Create a terrific tiger with just a plate and some stripes. This is one of those animal crafts that looks impressive but is secretly very easy. You can even make paper plate zebras, a paper plate duck, a paper plate giraffe, a paper plate hippo, paper plate piggies, or a paper plate chicken next!
Paint a paper plate orange and let it dry completely.
Cut out several thin, black strips from construction paper for the tiger's stripes.
Glue the stripes onto the plate. You can put some above the eyes and a few on each cheek. Don't worry about them being perfect!
Cut two ear shapes from another piece of orange paper and glue them to the back of the plate at the top.
Add googly eyes and use a marker to draw a nose and mouth on a small white paper circle. Glue this muzzle onto the center of the face. Your tiger is ready to pounce!
Creative Paper Plate Crafts for Every Occasion
Paper plates are not just for parties; they are perfect for celebrating the seasons! These holiday themed crafts are a wonderful way to get your little ones excited about upcoming special days. From spring cheer to winter wonder, you can mark the entire year with fun arts and crafts.
Spring Chick
Welcome the new season with an adorable hatching chick. This is one of those fun crafts with paper plates for preschoolers that is sure to bring a smile.
First, have your child paint an Ecolipak plate bright yellow.
While it dries, glue some yellow craft feathers onto the plate for a fluffy texture.
Cut a small diamond shape from orange construction paper and fold it in half to create a beak. Glue it onto the middle of the plate.
Add two googly eyes just above the beak.
For the final touch, you can glue two orange pipe cleaner legs to the back of the plate. Your little chick is ready to chirp!
Summer Sunshine
Brighten up any room with a cheerful sun! This paper plate sunshine craft is one of the most popular summer crafts for kids because it’s so simple and happy.
Tip: This is a fantastic way to create a keepsake. Just write the date on the back of one of the handprints!
Start by painting your paper plate a brilliant, sunny yellow.
While the paint is drying, trace your child's hands on yellow and orange construction paper. You will need about 5-7 handprints.
Cut out the handprints. These will become the sun's rays.
Once the plate is dry, glue the handprints all around the back edge of the plate.
Flip it over and draw a happy face with a black marker. Your paper plate sunshine craft is complete! This is one of our favorite summer crafts for kids.
This activity is a perfect example of easy summer crafts for kids that require minimal supplies but deliver maximum fun.
Halloween Pumpkin
Get into the spooky spirit with a classic jack-o'-lantern. You don't need to carve a real pumpkin to have fun with this Halloween craft.
Paint your Ecolipak plate bright orange. Let it dry completely.
From black construction paper, cut out two triangles for eyes, a smaller triangle for a nose, and a spooky or silly mouth.
Let your preschooler glue the face pieces onto the orange plate.
Cut a small rectangle from brown or green paper for the stem and glue it to the top. Your pumpkin is ready for Halloween night!
Thanksgiving Turkey
Gobble, gobble! This colorful turkey is a Thanksgiving crafting tradition and a great way to talk about what you're thankful for.
Begin by painting a paper plate brown for the turkey's body.
While it dries, cut out several feather shapes from different colors of construction paper—think red, orange, yellow, and green.
Glue the colorful feathers in a fan shape onto the back of the brown plate so they stick out from the top.
For the face, glue on two googly eyes.
Cut a small orange triangle for the beak and a squiggly red shape (the "snood") from paper. Glue them onto the front of the plate. What a festive turkey!
Winter Snowman
You don't need snow to build a snowman! This is one of the coziest paper plate crafts for a chilly day.
Parent Tip: For this craft, you will need two plates: a larger one for the body and a smaller one (like a 6-inch or 7-inch Ecolipak plate) for the head.
Glue the smaller plate so it overlaps the top of the larger plate.
Use black paper circles or buttons for the eyes and mouth. Glue them onto the head.
Cut a small carrot nose from orange paper and glue it in the middle of the face.
Glue three larger black buttons down the snowman's body.
Finally, tie a strip of fabric or ribbon around the "neck" for a cozy scarf.
Christmas Wreath
Deck the halls with a beautiful, kid-made wreath. This is a wonderful activity to get everyone in the holiday spirit.
First, an adult should carefully cut the center circle out of a paper plate, leaving just the outer rim.
Give your child a paintbrush and some glue. Have them paint glue all over the paper plate rim.
Tear up green tissue paper into small squares. Let your child stick the green squares all over the gluey rim. It's okay if it's messy—that makes it look more like a real wreath!
For a festive touch, add a few red pom-poms or scrunched-up red tissue paper for "berries."
Finish it off by tying a red bow at the bottom or top. Now you have a beautiful decoration for your door!
More Fun Crafts with Paper Plates for Preschoolers
Ready for even more creative fun? The possibilities for arts and crafts are truly endless with a simple plate. These next few projects are perfect for an afternoon of crafting and are some of the most fun crafts with paper plates for preschoolers. You can even use the leftover plate rims to create a paper plate ring toss game!
Colorful Rainbow
Brighten up any day with a beautiful rainbow craft. This is a classic project that preschoolers love.
First, cut an Ecolipak paper plate in half. Each half makes one rainbow!
Paint colorful arcs on the plate, starting with red on the outside and working your way in.
Once the paint is dry, spread some glue along the flat bottom edge of the rainbow.
Pull apart some cotton balls to make them extra fluffy and press them onto the glue. These are your puffy clouds! Your rainbow is ready to shine.
Cheerful Flower
Bring a little bit of the garden inside with a cheerful paper plate flower.
Paint the center of your paper plate yellow or brown. This will be the middle of your flower.
While it dries, cut out several petal shapes from colorful construction paper.
Glue the petals all around the back edge of the plate.
You can even glue a green popsicle stick to the back to create a stem!
Pirate Craft
Ahoy, matey! Let's make a pirate face, complete with a bandanna and eye patch.
Paint a paper plate with a skin-tone color and let it dry.
Cut a half-circle from red or black construction paper for the bandanna and glue it to the top of the plate.
Next, cut a small circle and a thin strip from black paper to create an eye patch. Glue it in place.
Add a googly eye and use a black marker to draw a smile. Your pirate is ready to sail the seven seas! This is a great project to pair with a paper plate caterpillar craft.
Heart Sun Catcher
This is a beautiful project that looks magical hanging in a window.
Parent Tip: This craft uses clear contact paper to create the "glass" for the sun catcher.
An adult should carefully cut a large heart shape out of the center of a paper plate, leaving the rim intact.
Cut a piece of clear contact paper slightly larger than the heart opening. Peel off the backing and stick it to the back of the plate, covering the hole.
Flip the plate over. Let your child stick small squares of colorful tissue paper onto the sticky surface.
Seal the design by placing another piece of contact paper over the tissue paper. Hang it in a sunny window and watch the colors glow!
Emotion Masks
Talking about feelings is important, and these simple paper plate masks make it fun.
Cut a few paper plates in half.
On each half-plate, use a marker to draw a different emotion: happy, sad, surprised, or silly.
Talk with your child about what each feeling looks like and when they might feel that way.
Tape a popsicle stick to the back of each plate half to create a handle. Now your child can use their masks to show you how they are feeling! This is a wonderful alternative to a paper plate caterpillar craft.
Creating wonderful memories is easy with something as simple as an Ecolipak sugarcane plate. You get to watch your child's imagination come to life through these fun crafts with paper plates for preschoolers. These moments of shared arts and crafts are truly special. As Fred Rogers once said:
It’s the things we play with and the people who help us play that make a great difference in our lives.
Which of these projects will you try first? Grab your Ecolipak plates and let the fun begin!
Green Pack, Go for ECOLipak.
FAQ
Why are Ecolipak plates better than regular paper plates for crafts?
Ecolipak plates are much sturdier, so they won't get soggy from paint or glue. Your child's creation stays intact! Plus, you can compost them after crafting, making cleanup easy and eco-friendly. 🌎
Are these plates really safe for my preschooler to handle?
Absolutely! We make our plates from 100% natural sugarcane fiber. They are completely BPA-free and toxin-free. This gives you peace of mind while your little one gets creative.
What if my child puts the plate in their mouth?
No worries! Ecolipak plates are food-grade and made from natural materials. While they aren't meant for eating, you don't have to panic if one briefly ends up near your child's mouth during playtime.
Where can I get these plates for our craft projects?
You can easily find all sizes of our Compostable Sugarcane Plates right on the Ecolipak website. Head over to our online store to stock up for your next crafting adventure!