You baked a delicious, gooey dessert, but now you face the challenge. Your knife drags through the treat, creating messy, malformed slices. Achieving perfect portions feels impossible. Forget fancy gadgets. The secret to flawless tray desserts is an easy three-step method.
Key Takeaways
-
Chill your dessert completely. This makes it firm. Firm desserts are easy to cut.
-
Use a long, sharp knife. Wipe the knife clean after each cut. This stops messes.
-
Measure and mark your dessert first. This helps you cut even pieces. Do not saw; press the knife straight down.
-
Use the hot knife method for sticky desserts. This helps the knife glide through easily.
Prep for Perfect Portions
Before you even think about cutting, a little preparation goes a long way. These two simple steps set you up for success and guarantee clean, beautiful servings every time.
The Chill Factor: Your Key to Firm Desserts
Patience is your best friend when it comes to tray desserts. You must let your dessert chill completely. A cold dessert is a firm dessert. When you chill your creation, the fats like butter and oil solidify. Thickeners like pectin or cornstarch also continue to gel, creating a stable structure that won't fall apart. This firmness is what allows you to make clean cuts for all your servings.
How long should you chill? It depends on the dessert. A good rule of thumb is to let it cool to room temperature first, then move it to the refrigerator.
Chilling Time Guide
Dessert Type
Minimum Refrigerator Time
Fudgy Brownies & Candy Bars
At least 1 hour
Cheesecake Bars & Lemon Bars
At least 4 hours, or until fully set
Rushing this step will only lead to gooey, messy servings. Give your dessert the time it needs to firm up.
Line Your Pan for Easy Removal
Have you ever baked a perfect sheet of brownies only to have them stick to the pan? You can avoid this frustration by lining your pan with parchment paper. Parchment creates a non-stick barrier, making cleanup easy and ensuring your dessert lifts right out. This simple trick is the first step toward achieving perfect portions.
Creating a parchment "sling" is easy and makes removing the entire dessert sheet a breeze.
-
Cut the Paper: Cut a sheet of parchment paper so it fits the bottom of your pan with extra length hanging over two opposite sides. These overhangs will become your handles.
-
Secure the Sheet: Lightly grease the pan to help the parchment stick. Press the paper down, smoothing it out from the center to remove air bubbles.
-
Lift with Ease: Once your dessert has completely cooled, you can grab the parchment handles and lift the entire sheet out of the pan. This gives you a flat, stable surface to cut your individual servings.
This method is a game-changer for creating dozens of neat servings for any event.
Your Toolkit for Precision Cutting
With your dessert chilled and lifted from the pan, you are ready for the final step. Having the right tools and knowing how to use them will turn a tricky task into a simple one. Let's look at the best tools for the job.
Choosing the Right Knife
Your everyday butter knife won't work here. You need a knife that can make a long, clean slice without dragging. The best choice depends on your dessert's texture.
-
Long, Smooth-Bladed Knife: A chef's knife or a Santoku knife is perfect for most bars. The smooth edge glides through dense treats, giving you a polished finish.
-
Serrated Knife: Does your dessert have a crumbly crust on top? A serrated knife can saw through the top layer without cracking it.
-
Plastic Knife: This might sound strange, but a simple plastic knife is a secret weapon against sticky brownies. It creates less friction, so the brownie doesn't cling to the blade.
The Hot vs. Cold Knife Method
Temperature is your secret ingredient for the perfect cut. You can use a hot or cold knife to get flawless slices.
The hot knife method is a game-changer for dense or sticky desserts. It works wonders on fudge, cheesecakes, and rich brownies. As one baker put it:
Cheesecake Lovers | Tried my hand on the hot knife method, definitely a plus
Simply dip a long, smooth knife into a tall glass of hot water for a few seconds, then wipe it completely dry. The heated blade melts a tiny path as it cuts, preventing sticking and smearing.
A Quick Safety Tip 💡 When using the hot knife method, always work on a stable surface. Keep your fingers clear of the blade and make sure your cutting area is free of flammable items like paper towels. Always cut away from your body.
For most other chilled desserts, a clean, room-temperature knife works just fine. The key is to follow the golden rule: wipe your blade clean after every single cut. This prevents crumbs and filling from smearing onto the next slice.
A Guide to Measuring and Cutting
You have a beautifully chilled, firm sheet of dessert ready to go. Now, how do you turn that single sheet into dozens of identical, professional-looking servings? The answer is simple: measure first, cut second. This step removes all the guesswork and guarantees you get the perfect portions you want.
Scoring for Uniformity
Think of scoring as drawing a map on your dessert. You create faint lines on the surface to guide your knife for each cut. This simple action is the secret to getting uniform servings every time. A ruler is your best friend here, but other tools with a straight edge, like a bench scraper or even a clean pizza cutter, work well too.
Let's do some simple math. Say you want 24 servings from a standard 9x13-inch pan.
Easy Cutting Guide for a 9x13 Pan:
Long Side (13 inches): You need 6 rows. Mark the sheet every 2.25 inches.
Short Side (9 inches): You need 4 rows. Mark the sheet every 2.25 inches. This gives you 24 perfectly square servings!
Planning your number of servings is especially important for parties. For most party cakes, a slice is about 1.5 inches wide. The shape of your pan also changes how many servings you can get from a single sheet. As you can see below, square pans often yield more servings than round pans of a similar size.
|
Cake Shape |
Diameter (inches) |
Servings |
|---|---|---|
|
Round |
8 |
14 |
|
Square |
8 |
18 |
|
Round |
10 |
21 |
|
Square |
10 |
28 |
Use these numbers as a guide to plan your cuts and ensure you have enough servings for all your guests. Scoring the entire sheet first makes the final cutting process quick and easy.
The 'Press, Don't Saw' Technique
Here is where your patience pays off. With your chilled dessert sheet scored, it's time to make the cuts. The most important technique to remember is to press straight down. Do not use a sawing motion. Sawing drags crumbs and smears filling, ruining the clean edges you've worked so hard to get.
This is where the golden rule becomes critical. A clean knife is essential for clean servings.
The Clean Cut Method 🔪
Fill a tall glass with hot water.
Dip your knife in the hot water for a few seconds.
Wipe the blade completely dry with a paper towel. A wet knife will drip water onto your dessert.
Make one single, firm cut by pressing straight down. Follow the line you scored.
Wipe the blade clean.
Repeat for every single cut.
Yes, every single cut. Wiping the blade between each slice prevents any residue from transferring to the next piece. This ensures all your servings look just as perfect as the first one. Following this process transforms a whole sheet of dessert into many flawless servings, ready for any party.
Easy Tray Dessert Recipes
Now you can put your new skills to the test! These easy tray desserts are the perfect way to practice the cutting techniques we've covered. Each recipe creates a delicious treat with a unique texture, giving you a great opportunity to master perfect portions.
Easy Fudgy Brownies Recipe
This super easy fudgy brownies recipe is a chocolate lover's dream. The rich, gooey texture of these brownies makes them the ideal candidate for the hot knife method. A heated blade melts through the sticky chocolate, allowing you to glide through the treat for a clean cut instead of getting stuck. This recipe yields a full 9x13 sheet of dense brownies, perfect for creating dozens of mini bites.
Super Easy Fudge Brownie Recipe
Melt 1 cup of butter. Stir in 2 cups sugar, 4 eggs, and 2 tsp vanilla.
Gently mix in 2/3 cup cocoa powder, 1 cup flour, 1/2 tsp salt, and 1/2 tsp baking powder.
Fold in 1 cup of mini chocolate chips.
Pour into a lined 9x13 pan and bake at 350°F for 25-30 minutes.
Chill completely before cutting your perfect chocolate bites!
Lemon Bars with a Sturdy Crust
Lemon bars offer a delightful contrast between a soft filling and a firm cookie crust. This recipe creates a sturdy shortbread base that won't crumble. The key challenge here is keeping the vibrant lemon layer from smearing over the beautiful crust. This is where wiping your knife clean after every single cut is essential. You'll be rewarded with professional-looking bars that are as beautiful as they are tasty. These treats are a fantastic choice for sheet pan desserts.
Seven-Layer Magic Bar Recipe
These classic seven-layer magic bars are one of the most fun and easy cake mix bars to make. With layers of graham cracker, chocolate chips, butterscotch, coconut, and nuts, this recipe creates a wonderfully complex treat. The different textures make it a great final test for your "press, don't saw" technique. After chilling, you can cut this sheet into many mini cakes or bars. Imagine a platter of these mini treats at your next party!
Serving Your Desserts with Ecolipak
You've mastered the art of the perfect cut. Now it's time to present your beautiful individual servings. Serving your creations should be just as thoughtful as baking them. With Ecolipak, you can choose a sustainable option that makes cleanup a breeze and lets your desserts shine. Our brand is dedicated to providing eco-friendly solutions, so you can feel good about every part of your gathering.
The Perfect Plate for Every Slice
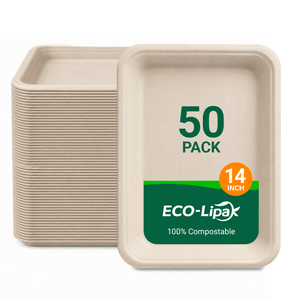
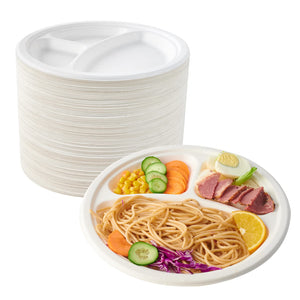
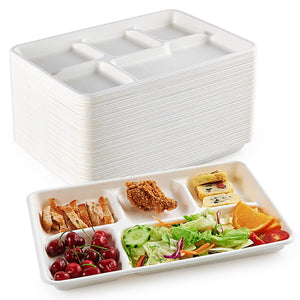
Imagine handing out your perfect mini brownies or lemon bars on a plate that keeps everything neat. The Compostable Sugarcane 3 Compartment Potluck Plates are designed for exactly this. The main compartment is the perfect home for your cake or bar, while the two smaller sections give you space for fun extras. This design is fantastic for portion control and creating beautiful individual servings.
You can elevate your individual servings by adding a little something on the side. Try pairing your mini desserts with:
-
A few fresh berries or sweet apple slices
-
A sprinkle of candied nuts
-
A dollop of whipped cream or a drizzle of chocolate sauce
These plates make your individual servings look amazing and keep flavors from mixing. Each guest gets their own perfect mini plate of treats.
Sustainable Serving for Parties
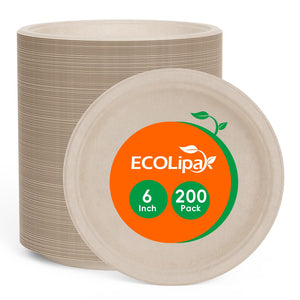
When you're serving a crowd, disposable plates are a huge help. But you don't have to rely on plastic. Ecolipak plates are made from sugarcane fiber, a renewable resource. They are BPI-certified compostable and BPA-free, breaking down in months, not centuries. This makes them a much better choice for the planet.
One host for a large food and wine event loved how our sturdy plates held up with all kinds of individual servings, noting they didn't leak or bend.
These plates are sturdy, cut-resistant, and ready for any crowd. Whether it's a family potluck or a big party, you can trust these plates to handle all your mini servings. You get the convenience you need for a large crowd without the environmental guilt. Your crowd gets delicious individual servings, and you get an easy, eco-friendly cleanup. It's the perfect way to share your hard work and impress every guest at your gathering.
You now have the secrets to perfect portions! Making beautiful desserts is easy when you remember these key steps.
Chill your dessert until it's firm.
Use a sharp knife, wiping it clean after every slice.
Measure and score first for uniform pieces.
Now, you're ready for some easy baking. Try a recipe and serve your creations on Ecolipak plates. We'd love to see your perfect portions—share your photos with us!
FAQ
How do I get the most mini servings from one cake?
You can get many mini servings from a single sheet cake. Plan your cuts before you start. For a large cake, scoring faint lines first helps you create uniform mini servings. This ensures every mini cake portion is the same size for all your guests.
What's the best way to cut a sticky chocolate cake?
A sticky chocolate cake needs a special touch. Use the hot knife method for perfect mini servings. The heat helps the knife glide through the rich chocolate. This trick prevents the chocolate cake from sticking and gives you clean mini servings every time.
Can I use these tips for a multi-layer cake?
Yes, these tips work for a multi-layer cake too. Chilling is very important for a layer cake. A firm cake makes cutting easier. You can create many mini servings from a large cake. This method helps you get clean servings from any cake.
Why are my mini cake servings still messy?
Messy mini servings usually happen for two reasons. You might not be chilling the cake long enough. Or, you might forget to wipe the knife. Remember to clean your blade after every single cut to get perfect mini servings from your chocolate cake.